Tuesday, 12 November 2024
DIY Pole Barn: How to Build a Custom Garage

Alright, you've got the dream - a spacious, custom garage to house your prized car, your workshop tools, maybe even a tiny home for your furry friend (no judgment here). But hiring a contractor? That's a big chunk of change. So, you're thinking DIY, and you're eyeing up those sturdy, simple pole barns. Great idea! Let's dive into this adventure together.
First Things First: The Plan
Before you grab your hammer and start hammering, we need a plan. Think about what you want this garage to be:
Size Matters: How big is the car? Will you have a workshop area? Do you need space for a motorcycle, ATV, or maybe even a boat?
Height and Clearance: Got a pickup truck? An SUV with a roof rack? You'll need enough height for those tall vehicles.
Style: Do you want a classic, simple design, or something more modern with windows and fancy doors?
Location: Make sure your chosen spot is level, has access to utilities, and fits within local building codes.
Budget: Be realistic about how much you can spend. Don't get carried away with fancy features if your wallet screams "stop!"
The Blueprint: Drawing Your Dreams
Now, grab a pencil and paper (or fire up your favorite CAD software) and start sketching. You don't need to be an architect, but you should have a basic idea of:
Foundation: Will you go with concrete piers, concrete slabs, or maybe even a gravel foundation?
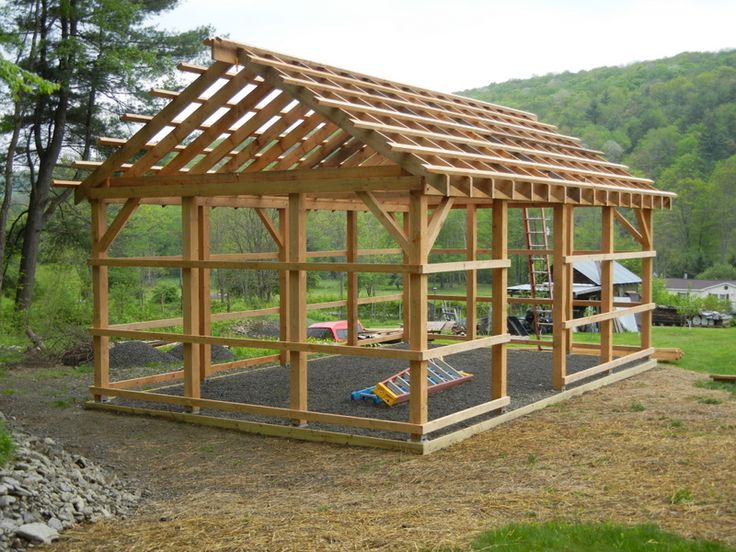
Pole Spacing: This will depend on the size and weight of your garage, but typically 8-10 feet apart is a good starting point.
Roof Style: A simple gable roof is easy to build, but you could go for a hip roof or a gambrel roof for a more unique look.
Doors: Single, double, garage-style, or even a combination of doors? Think about the size and type that will fit your needs.
Windows: Add some light and ventilation with strategically placed windows.
Gathering Your Crew and Gear
Building a pole barn isn't a solo mission. Grab some friends or family to help with lifting, moving, and holding things steady. You'll need:
Tools: A hammer, saw, drill, tape measure, level, circular saw, and a good set of screwdrivers are must-haves.
Materials: This is where your budget comes into play. You'll need lumber (poles, framing, sheathing, roofing), fasteners (nails, screws, bolts), concrete (for piers or slab), insulation, siding, roofing material, and doors.
Safety Gear: Don't forget your safety glasses, gloves, hard hat, and sturdy boots. Safety first!
Building Blocks: Laying the Foundation
Prepare the Site: Clear any vegetation, level the ground, and mark out your foundation.
Concrete Piers (Most Common): Dig holes to the desired depth, set forms, pour concrete, and let it cure.
Concrete Slab: Pour a level concrete slab, but remember to include footings for your poles.
Gravel Foundation: Lay down a thick layer of gravel, compacted and levelled, for a budget-friendly option.
Standing Tall: Erecting the Poles
Post Installation: This is where the real teamwork comes in! Set the poles precisely on the foundation, using a level to ensure they are plumb (perfectly vertical).
Brace and Secure: Secure the poles to the foundation using anchor bolts or concrete fill. Bracing is essential to prevent sway and movement.
Top Plate and Lintels: Once the poles are up, install a top plate to connect them at the top, and then add lintels to create openings for doors and windows.
Building the Roof:
Rafters and Trusses: Depending on the size and complexity of your roof, you'll either build rafters or install pre-made roof trusses.
Sheathing: Apply plywood sheathing to the rafters or trusses to create a solid base for roofing.
Roofing: Now comes the part where you get to choose your style! Metal roofing is popular for its durability and low maintenance, but shingles are also a good option.
Enclosing the Space:
Siding: You have a wide range of options for siding, from wood to vinyl to metal.
Windows and Doors: Install the windows and doors, paying close attention to weatherproofing and insulation.
Insulation: Add insulation to the walls and ceiling to keep your garage warm in the winter and cool in the summer.
Finishing Touches:
Electrical: Run electrical wiring, install outlets, and add lighting.
Flooring: Choose a flooring that's durable and easy to clean. Concrete is popular for its durability, but you can also use wood, epoxy, or even tile.
Interior Finishes: Add shelves, cabinets, workbenches, and other storage solutions to create a functional and organized space.
Building Codes and Permits
Don't forget about building codes and permits! Contact your local building department to find out what regulations you need to follow.
Embrace the Journey:
Building your own garage is a journey, not a sprint. There will be challenges, moments of frustration, and maybe even a few mistakes. But with patience, planning, and teamwork, you can create a garage that you'll be proud to call your own.
Remember: This is just a general guide. There are countless resources available online, in libraries, and at home improvement stores to help you with specific details. Take your time, learn from others, and most importantly, have fun building your dream garage!
No comments:
Post a Comment
Note: only a member of this blog may post a comment.